Bathroom Remodel – Part 1 – Demolition

Posted on

 After living in our home for almost 5 years…..we finally took the plunge and decided to remodel a room. And being newbies to all of it, why not start on the most complicated room in the entire house…right? Ah, the master bathroom. Just to give you a backstory, we bought our house as a foreclosure. And as I’m sure you can tell, I love taking ugly things and making them pretty. So, I didn’t need a house that was “move-in ready”. I needed a house that has potential to be something better than it is! So here is my lovely house before we bought it:

100_5525

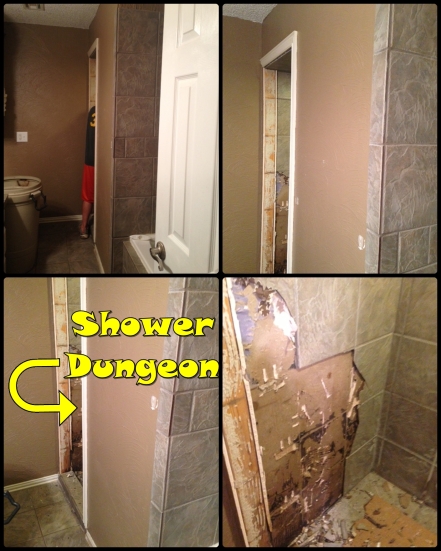
And here is some of the master bathroom specifically what I refer to as the “shower dungeon”

photo 8

Here you can see the bathtub behind the door (which I hate that the door hits the tub every time you open it, but that’s another project for another day). Where my husband is at is the shower dungeon which is a walled-in door leading to the shower which has no closure. Good in theory, but just bad done like this.

100_5497

My baby standing inside the shower when he was 3….(sniff sniff)….where does the time go?!

100_5498

More inside the shower dungeon.

The pictures don’t show it much….but this place is TRULY the house that tile built. The father of the couple that lived here made a living installing tile. And let me tell ya, this house probably kept him in biz-naz. There’s tile on the floor, countertop, wall, everywhere. I hate it! And not so much that it’s tile, but it’s the same damn tile everywhere. And it’s gray and cold and lifeless in a bathroom with no sunlight! It made me sad to go in there. But, I could see the potential and knew we could fix it eventually.

So now the demo!

page1

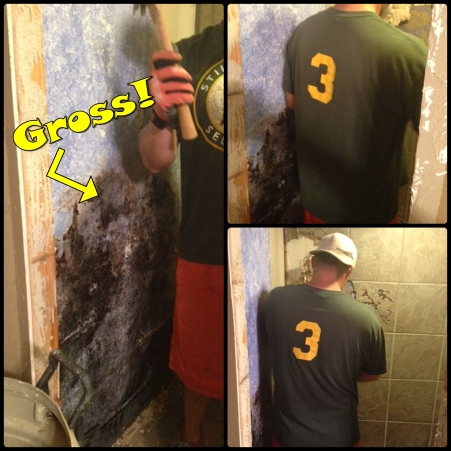
Demo is fun! Don’t let anyone tell you differently. However, it was just downright wrong the amount of mold found in this shower stall.

page2

See that?! This was just a tidbit of what was found all along the bottom half of the shower. Don’t get me wrong, I expected to find some mold. SOME mold. But not this much. We always noticed it smelled musty and never dried completely out in between showers. And now we know why. You are supposed to use concrete backer board in wet areas such as showers because it doesn’t absorb water therefore mold cannot grow on it. The people that installed this shower used regular sheetrock…….PLAIN SHEETROCK!!!! It was soaked and covered in mold. The minute my husband touched it, it crumbled. There’s no telling how that tile didn’t just start falling off the wall. Plus, the bottom tiles were glued directly onto the rubber membrane instead of concrete. I promise you none of this was up to code.

photo 3

After knocking out that half wall, we finally got it down to the studs. Even naked and bare, it looks much better than when we started.

photo 4

After the shower was demo-ed, removing tile off the bathtub was simple. Time consuming and dirty, but easy. Stay tuned for part 2!

Aqua Blue Hexagon Nightstand Remix

GARAGE SALE FIND ALERT!!!! That’s right kiddos! I found my next project. And here she is:

Hex Nightstand Before2

Oh isn’t she just GLORIOUS!!! I have seen this piece in SO many people’s houses just sitting in the dark corner wasting away. Cast out due to her 1970s panel style doors and hexagon shape. But to me, she is crying out for a makeover! I bought this gem for a whole $5. It was covered in spider eggs and most of the top had water damage from someone, I would assume, not using a coaster  (grrrrrr….). Constructed of solid wood, she just need a little tlc and a lot of sanding……and bleach. A little bleach never hurts.

Crystal Aqua

I am still on the hunt for the right color of blue for my kitchen chairs so I thought I’d try a sample of Valspar ‘Crystal Aqua’ 5006-78. It is more blue than green so be advised. Still a very lovely shade of blue.

Hex Stand2

After sanding, painting, sanding again, replacing with a glass door knob, and filling in the old drawer pull holes……….TADA!!!! She’s ready to shine again! I wish I had a place to put her. Unfortunately, the hubsters said we didn’t have room so I sold it on Craigslist. The girl I sold it to seemed to love it as much as I do. Glad I could save this piece and make someone else smile in the process 🙂

Hex Nightstand page

Red Wedding Bouquet

So….have you noticed I haven’t done weddings in a while? Yeah, me too. I really do miss it. I got a new position at work and unfortunately, it is not as laid back as my old position. Therefore, I don’t have as much time to work on flowers as I used to. I have, however, had bouquet requests from friends of friends (of friends, of friends….). Those are manageable. Here is the latest one:

Red Bouquet

A lovely bouquet of all red Gerbera daisies, ‘Charlotte’ roses, zinnias, and Indian Blanket (from my own backyard). All wrapped in a burlap and lace handle and oversized brown button. Perfect for a country wedding!

Red Bouquet Prof

Red Bouquet Prof2

Professional pictures by Treehouse Images: treehouseimagesbylorilockhart@gmail.com

Coffee Table / Wooden Trunk Transformation

 This was one of my toughest pieces to work on…..

IMG_8490

This GORGEOUS solid wood Broyhill trunk! Ugh, I had a hard time deciding whether or not to change it from this beautiful natural wood color to something else. It was so pretty by itself…..but yet by itself, it was also pretty bland. This was slated to go into a brand new apartment with neutral walls and very little color. Therefore, we needed to make it a statement piece. So, first thing’s first……we need to sand that sucker down! And when I say sand down, I mean down through the clear lacquer so I could stain the wood underneath:

image9

Boy is that ugly, right?! I went through about 2 boxes of sandpaper getting it to this stage. Phew! Thank GOD for electric palm sanders!

image7

This is the color I chose for the trunk. It is Valspar “Sea Lily”. Looks like a mix between turquoise and sea foam green. Pretty cute. And here are the results after several coats and lightly distressing:

 image11

Overall, I’m happy with the results!

Trunkpage


Repurposed Wood Tissue Box

One of my absolute favorite things to look for on pinterest is things that have been repurposed. I know you love it too! So, here’s my green thumb version of upcycling!

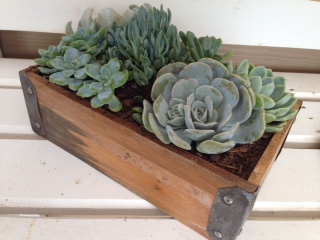
Planter1

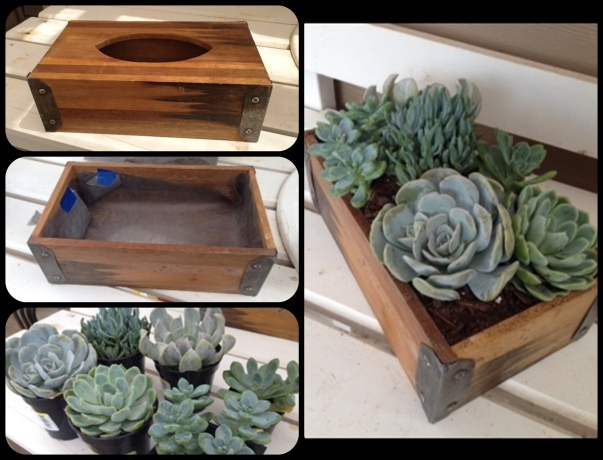
Tada! It’s one of my favorite garage sale finds. For a whole .50, I bought this wooden tissue box. And that’s ALL I bought at this garage sale!  I know, right?!  I am a garage sale junkie so this was a big deal for me…. I have an unexplained love for wooden things, especially boxes (don’t ask). This one really caught my eye for the metal corner brackets. So, I purchased it and brought it home….and had no idea what to do with it. BUT, I had also been to Lowe’s this day and bought a bunch of succulents on sale (couldn’t resist that one). After thinking long and hard, I flipped this thing over and had a epiphany:

Planter2

Whoa, hold the phone…..that tissue box opening looks an awful lot like a drainage hole on the bottom of a plant container. Ding, ding, ding!!

First thing’s first, I need to make sure the dirt doesn’t fall through that big hole. The best thing I could recommend to use is landscape fabric which we use for installation of flowerbeds to keep weeds out. It doesn’t inhibit water flow but it keeps the dirt contained. You could probably use newspaper too but keep in mind, newspaper is biodegradable so it will eventually disintegrate. For a container, newspaper would probably last the summer season before it falls apart  so no big deal.

You’ll want to cut it square and tape it to the sides of the container:

Planter3

Trim any excess fabric that pokes up over the top. (Hide your mechanics as they used to tell me at the flower shop). Time to add the soil!

Planter5

Listen…..I have a degree in Horticulture so believe me when I say there is a HUGE difference in potting mixes out there.  Don’t buy the cheap stuff!  Your plants will suffer. I am a firm believer in Miracle-Gro. I’ve done my own tests with generic mixes and Miracle-Gro and I’ll never skimp again. I picked this mix knowing it had quite a bit of sand in it which succulents need for good drainage.

Planter4

Aren’t my plants so pretty? Time to arrange them in their new container and fill in the gaps with potting mix.

Planter8

And done! How simple is that? Try it yourself with ferns, ivy, or whatever tickles your fancy 🙂 Have fun!

Succulent Page

Nightstand Remix

We just had a neighborhood garage sale – and it was insane! We pretty much sold everything…..except this little nightstand.

Nightstand before

Our neighbor donated it to the sale just to get it out of his house and no one saw the potential in it…..but me 🙂 Although it’s not 100% solid wood like prefer to work with, I figured I couldn’t hurt it much more than it had already been through. I removed the drawer handles and tried my best to pull the 2 layers of contact paper off the top (why do people put contact paper on real wood?!). Then I had to repair one of the legs, fix both drawer slides and pull duct tape off the back plywood panel. Yeesh, this poor thing had had it rough! After scratching up the varnish with my palm sander, I painted it off white. It was getting late so I didn’t have time to mix up the chalk paint like I normally prefer to use so let this be a good example of the difference between distressing techniques.

2Nightstand after1

After using 3 coats of paint, I sanded it back down to distress it.  You can see how the sander pulled off larger chunks of paint when you don’t use chalk paint. And honestly, this looks a little more authentic than when you use chalk paint but it is a booger to sand through. So, whatever your preference, I say go for it.I Bought two glass drawer pulls and one metal one at Lowes and reattached. Total investment, $15. Not too shabby if I do say so myself!

Nightstand before and after

Remember, everything has potential! Don’t give up on it just because it doesn’t look perfect right off the bat. Paint works miracles!


DIY Farmhouse Table Re-do

Posted on

page - Dining Table

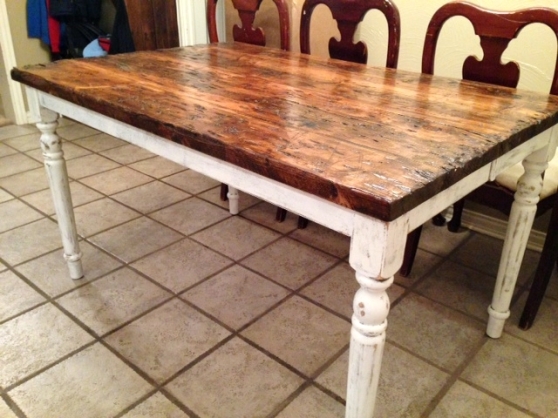
This is one of my PROUDEST repurposing pieces of furniture to date! I am really getting into the primitive farmhouse look for my home but I don’t have the time (or money) to go shopping around flea markets. So, we have to get crafty with what is available. Let me show you how I took my country style table and revamped it into my new, awesomely awesome farmhouse dining table.

Before Table

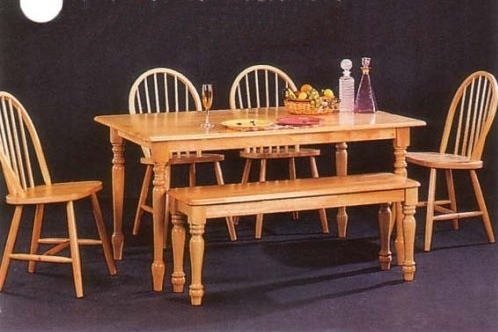
So……there she is. My lovely, 1980s style country table. (sigh) Don’t act like you haven’t seen this table in every garage sale, goodwill store, junkyards, or around apartment store dumpster tossed from people who were suckered into purchasing her just like me. Oh yes, she gets around baby. She’s a beast. It was my very first purchase as a “big kid” right before I went into college. Solid wood and seats up to 10 people, she gave the “country” look at an affordable price. Although I loved it when I first purchased it, it didn’t take long for her and I to form a love/hate relationship. I loved the legs but that was it. But I paid too much money to just get rid of it. SO, I kept it and lugged it to every apartment and rent house for 15 years! Then I came across this little gem:

Farmhouse Inspiration

Look how much character this table has! Even without decorative items on top of it, she looks divine. Here is the link I found on pinterest for this table: http://ana-white.com/2013/05/plans/husky-farmhouse-table (always have to give credit to where these things originated). It’s chunky, it’s chippy, it’s got character. I love it! But I don’t have the $$$ to create it from scratch – did I mention I’m poor? I do, however, have potential with my monstrosity of a table.

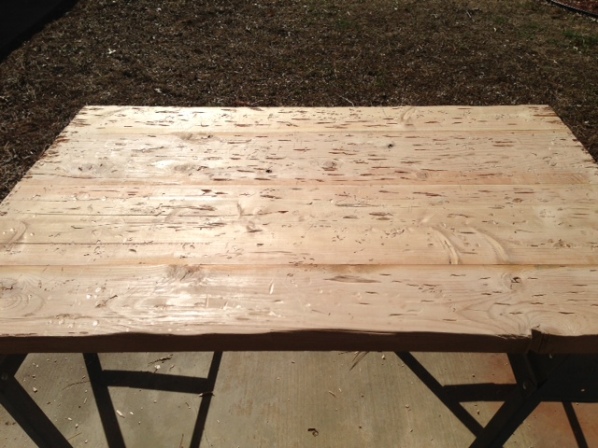
I decided to dismantle my table, screw by ever-lovin screw. I only needed to remove the tabletop from the legs but the way my table was put together, I practically had to take it all apart. I bought 2 – 2x8x12’s and cut them in half to give me 4 – 2x8x6’s. I ran them through a table planer, which should not be confused with a portable hand planer. I learned from my bathroom remodel that you can’t just glue 2×4’s together and expect to get a clean, smooth edge. Those pieces of lumber you buy at Lowe’s are not necessarily meant for furniture and need to be cleaned up. The best way to get a smooth top is to run all pieces of wood through the table planer. It completely squares everything out and gives you a nice, flat, seamless edge to glue all pieces. So that’s what I did. Luckily, I also have an amazing friend who owns a biscuit joiner and worked those the pieces for me (don’t ask me what it is but here’s a link to it: http://www.startwoodworking.com/post/how-use-biscuit-joints).

photo4

After all pieces were glued and clamped together for a couple days, it was ready to distress! (Enter my 7 year old with a claw hammer, piece of chain, and mad evil scientist laugh – buwaahhhaaa!) Seriously, there is no wrong way to distress a piece of wood. My youngster had a ball with his hammer and chain. All those little divots are his handy work and I took the back of a hammer and started gouging out chunks of wood. The deeper the gouge, the better the stain would look. If you’re trying to make it look authentic, you’ll want to distress the edges really hard since in real life, those are the most vulnerable to wear and tear. 

image4

Now for the stain. I used a combo of Minwax “Dark Walnut” and “Provencial” alternating in long streak patterns across the top. Always stain in the direction of the grain. Never go perpendicular.

image3

The deep gouges I cut with the back of the hammer really took the dark stain well and I was very pleased with the outcome. So purdy….

image6

Here’s the magic trick to sealing the wood. I wanted it to be water-resistant since we will sit around it but I didn’t want to put a super shiny lacquer on top. The answer….Teak Oil. This oil is absorbed into the wood and seals it from the inside out. Then it puts a slight shine to it. The more coats you put on, the shinier it gets. So it’s not super shiny right off the bat. You can choose how shiny you want it. I put on 3 coats but it would’ve been ok with 2.

Teak Oil takes a few days to completely cure. That’s the bummer of it, but it was well worth it. As I was waiting for it to cure, I painted the legs of the dismantled table with white chalk paint (remember that stuff from the Lego project?) and distressed it.

image10

Finally the oil had dried and I could put it all back together. Voila!  Isn’t she a beaut?! And seriously, it cost me around $30 for the wood, stain, and oil.

photo3

And here it is staged with my new chairs I bought at a garage sale for $30. I will eventually paint them a aqua blue and recover the cushions but for now, I am not hating them….so no rush just yet! Hope this inspires you!


Bathroom Window Art

I’m a full time Pinterest-a-holic. I’ll be honest about it. It speaks to my soul! I am such a visual person. I love seeing a new idea and then try to re-create it in my own Anna-ness. So….I saw this on Pinterest:

Photo1

http://onekriegerchick.com/2013/07/12/kilee-post/

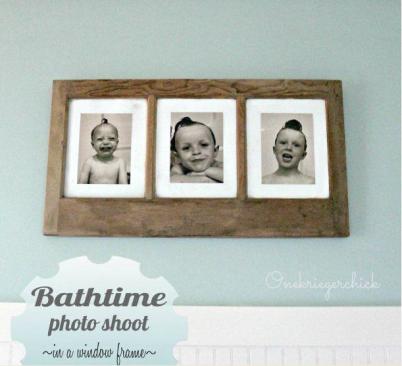
This blogger took an old window pane and put in photos of their kids while in the bathtub to use as bathroom wall art. Super cute, right?! Step 1, find a Pinterest project – check! Step 2, sprinkle some Anna-dust over it and make it mine 🙂  It took me MONTHS to find an old window that people weren’t trying to sell to Pinsters like myself for an arm and a leg. I found one at a junk store for $10. Much like this one:

It was crusty, dusty, and old. I fell in love with it! After sanding it down, wiping the glass panes, and staining the wood underneath, it was ready for the photos.

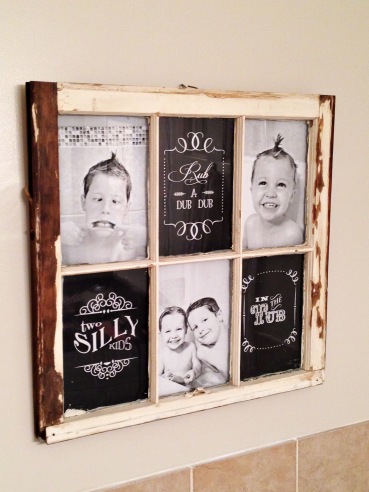
Problem: I don’t have 6 kids to fill in all those window panes. And since I don’t have the time (or money) to push out any more kids to fix that problem, I had to get creative. I don’t know about you, but I just adore chalkboard writing. Unfortunately, I don’t have a steady hand for it. BUT, I do have MAD computer skillz! So I went to work downloading every and all free chalkboard fonts I could find. I took it over to Microsoft Publisher and created some cute work art to resemble chalkboard art. Did a quick photo shoot with the kiddos in the tub, printed it all on regular paper, and taped it to the back of the window. BAM! What do you think?

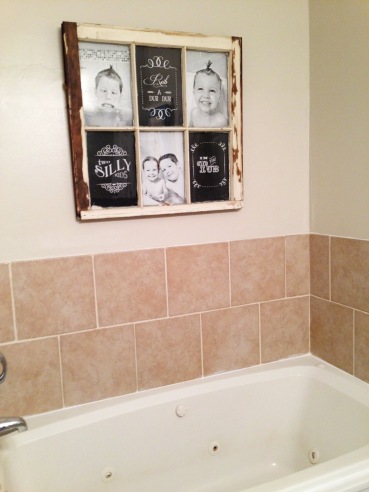
Window Bathroom Art2

Window Bathroom Art

Total cost…..$10. Yee-haw! I love cheap house decor!

Lego Mini-Figure Display from Picture Frame

 Raise your hand if you are the parent of a child who is addicted to Legos and you are desperate to find ANYTHING to organize the mess…..YEP! I thought so. I am not the only one.

This project was realized after going through countless plastic ziploc baggies full of Legos (our only method of Lego organization) while my oldest son pitch a full on “2-year old style tantrum” when he couldn’t find his prized Golden Ninja mini-figure as we were trying to walk out the door. I’m sure this sounds familiar to most parents….

Here was the inspiration I saw on Pinterest:

http://kirstycolquhoun.blogspot.com/2011/08/day-seventy-lego-minifig-storage.html

It looked great but I had some bad experiences using superglue on glass. SO….

Lego Board Before

 I bought these two “awesome” canvas prints at a garage sale – 2 for $7! It was a steal. Little did I think that this is what I’d be doing with them. But hey, you have to use what you got, right?

image

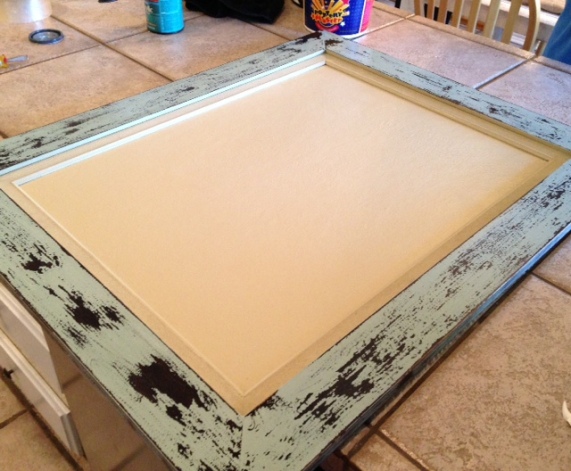
 Here you can see I’ve primed over the canvas painting. It’ll take a few coats to go over something that dark and textured. I’ve also painted the frame a color that goes well with my son’s room. I knew I was going to distress the edges so I used this little technique on how to create your own chalk paint: http://inmyownstyle.com/2012/08/testing-1-2-3-versions-of-chalk-paint.html

Lego Board without legos

 If you haven’t heard about chalk paint, you are literally living in a hole. Literally. If you’ve ever tried to distress something using regular paint, you end up so-so results and a really sore arm. Sprinkling in a little Plaster of Paris and water to any paint, you get MUCH better results. I always use a palm sander on my distressing projects. Don’t ask me what grit I used for the sandpaper. It was whatever I could find in my garage. Beautiful results! I painted the inside of the frame a neutral color to match his room.

Lego Generic

 My son was adamant for me not to use any Legos from his collection so I found these at Wal-Mart for $15. It’s just a generic set of Legos and it had the most 2×2 pieces I could find for the cheapest price tag. You can buy them off the Lego.com website but hey, who has time to wait/pay for shipping?! Right?

Lego Board without mini figures

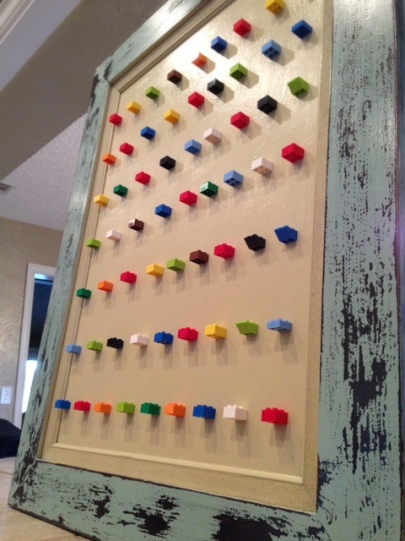
 After the paint had dried, I superglued the little 2×2 pieces to the canvas. You’ll want to get out your measuring tape to make sure the spacing is all aligned. Also, test it out with a little mini-figure to make sure they’ll all fit verticially without bumping into each other. Mine isn’t perfect. You can see I got a little wonky with the horizontal spacing in the middle sections . Also, you’ll notice on the second to last row, second to last piece, I ran out of 2×2 pieces so I had little angled pieces here and there. But hey, I ain’t no perfectionist. It’ll get the job done 😉

Lego Board with mini figures - After

 After the superglue had dried, this was my result! My son had a BLAST placing all these on the stands. And, it is now his responsiblity to make sure they are where they’re supposed to be and not under my foot late at night…..

Lego Board with mini figures - After2


“Character” Wall Art

 Office Sign - Character

So….our neighbor had this tree that had been dead for several summers…..

Tree Damage

….and it fell into our backyard busting up a few fence panels in the process. Honestly, the damage could’ve been worse so I wasn’t too upset. BUT, me being a hoarder one who doesn’t throw away good material, I took the broken fence panels and sanded them down. I then whitewashed them and sanded them down again. I took some mohogany gel stain and went over it with a damp cloth. Looked on Pinterest and found an awesome quote so I printed it on regular paper. Using an exacto-knife, I cut out the letters and used them as a stencil over my boards and voila!

Office Sign - Character

By the way, if you do a stencil on regular paper, it’s only good for one use. Once that paint wets the paper, it tends to tear and destroy your stencil. But it works in a pinch. Also, I could’ve cut each end flat and sanded it down but I LOVED the rough edges so I left them and put extra stain on them to make it look like the wood is aged. You wouldn’t believe how heavy this sucker is! I made sure to reinforce the back with 2 – 1x4s and made sure to drill it into a wall stud. Hope it inspires you!